Appspace account owners can directly access Appspace subscription and licensing information, billing details, and configure SSO (Single Sign-On), without having to log in to the Appspace console, via the cloud-based Account Management Portal at https://account.appspace.com, with Appspace credentials.
However, any Appspace user added to this system by the primary account owner will be able to access the support portal. Refer to Grant User Access to Support Portal.
The account owners may also license Appspace on-prem servers based on their subscription plans.
The following illustrates the layout and interface of the Account Management Portal.
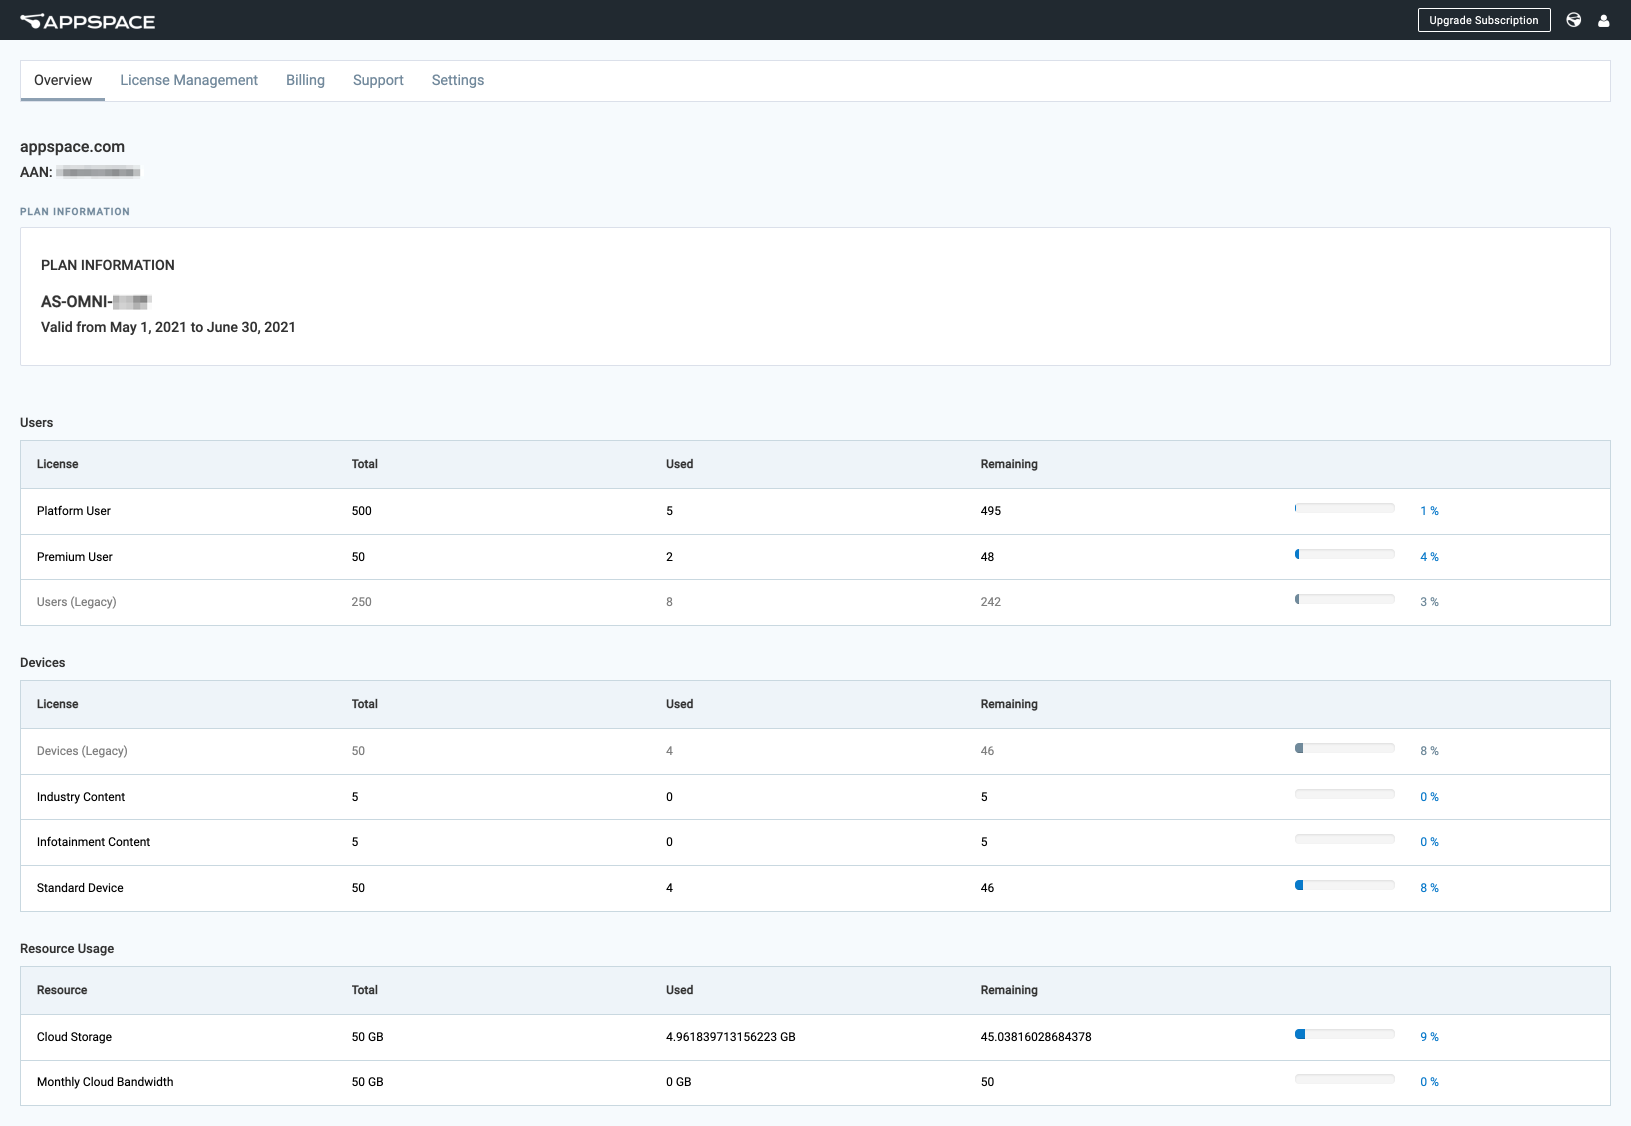
Overview
The Overview tab provides a summary of your company’s account information, subscription plan information, and licensing summary all in a single page.
The top section displays the company name and AAN number, followed by the PLAN INFORMATION which displays subscription plan type, and subscription validity dates.
We then have one section each for the summary of user license, device license, and resource usage (storage and bandwidth information) for both cloud and on-premise deployments in a table format. The information on these tables is updated automatically according to your current usage statistics.
License Management
The License Management tab displays licensing information for every cloud and on-prem instance currently licensed with Appspace.
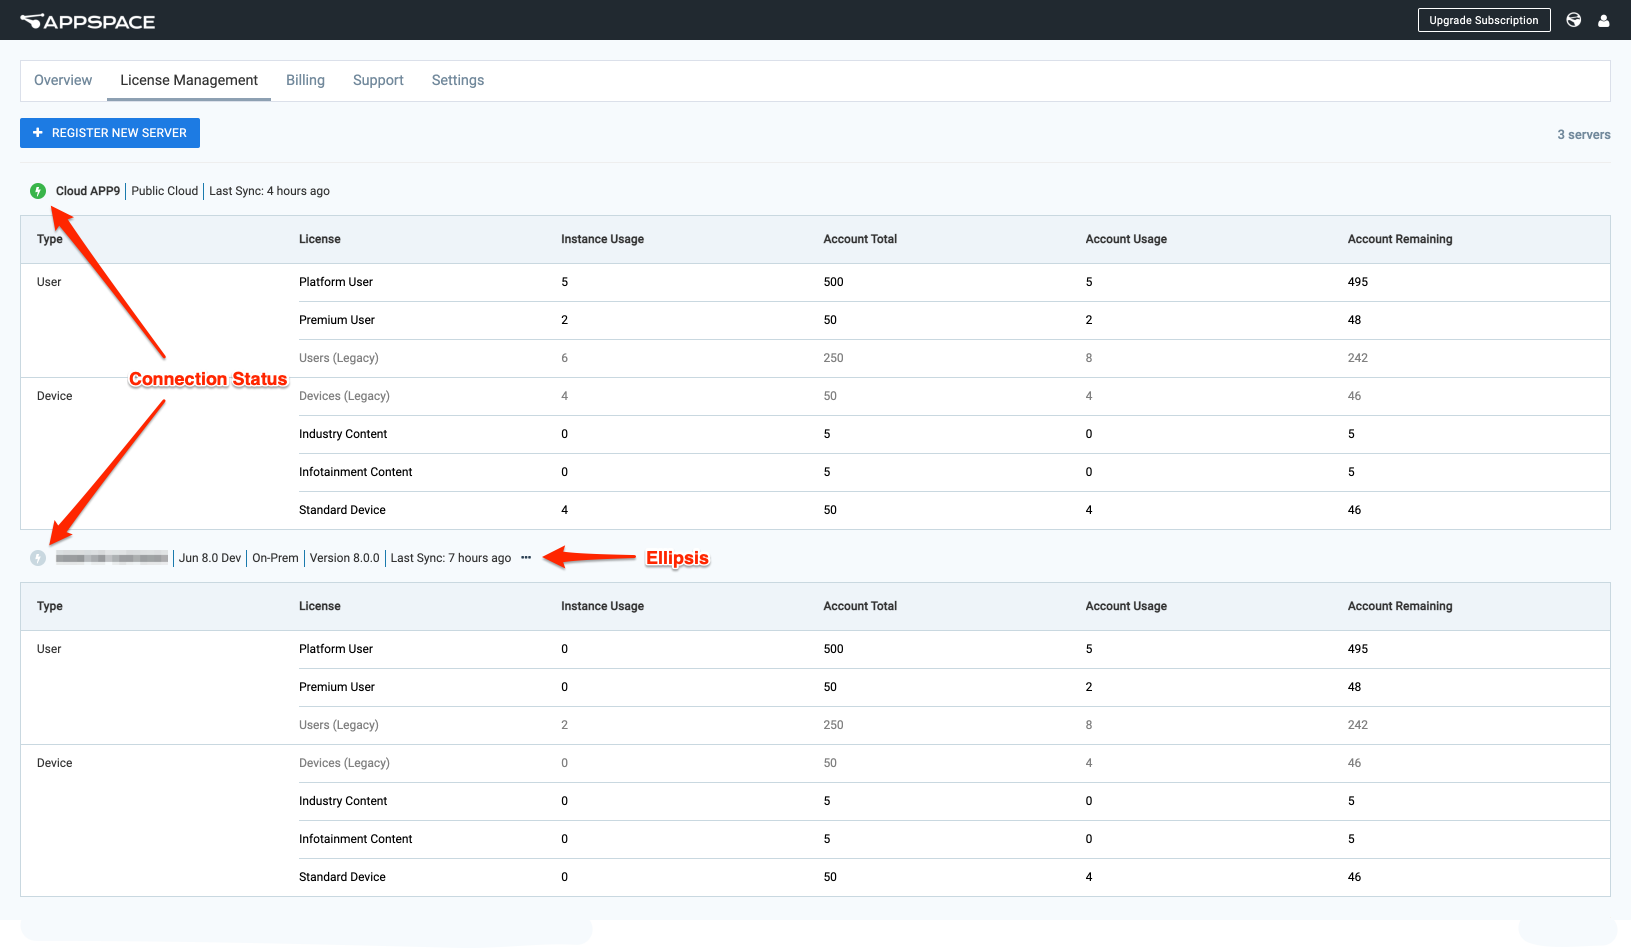
Each Appspace instance is displayed indicating the server name, server version (for on-prem), connectivity status (icon), and the last sync time, while the table below lists detail overall usage specifics for user and device licenses, or IDs for legacy accounts.
The connectivity status icon color indicates the following:
Cloud
- Online (green) – Cloud server is in sync with Appspace servers, and is currently online.
- Offline (grey) – Cloud server is offline.
On-Prem
- Online (green) – Dynamic server is successfully checked-in during the scheduled sync, or when cloud integration is enabled on a static server.
- Offline (grey) – Dynamic server fails to check-in after the 6 hour-scheduled sync, or when cloud integration is disabled on a static server.
- The REGISTER NEW SERVER button is only available on Appspace subscriptions with On-Prem (OP) licensing, and used to manually license your Appspace 7.2 on-prem server via the Advanced Licensing – Offline Activation method.
- Appspace on-prem deployments that are currently utilizing User and Device IDs, will be listed under Users (Legacy) and Device (Legacy) respectively.
On each Appspace on-prem server, clicking the ellipsis option allows you to perform the following additional options for your on-prem server:
- View license
- Renew server license – Renew or switch your Appspace 7.2 on-prem license.
- Manage ID allocation– This option is only available for offline activations.
- Deactivate server license – Deactivate your Appspace on-prem server.
- Enter pending receipt – This option is only available if you have not completed the last step of your license activation or deactivation.
Billing
The Billing tab lists account information, subscription plans, and billing history. You can also add your selected payment methods, currently supporting debit or credit cards, for their selected subscription plans.
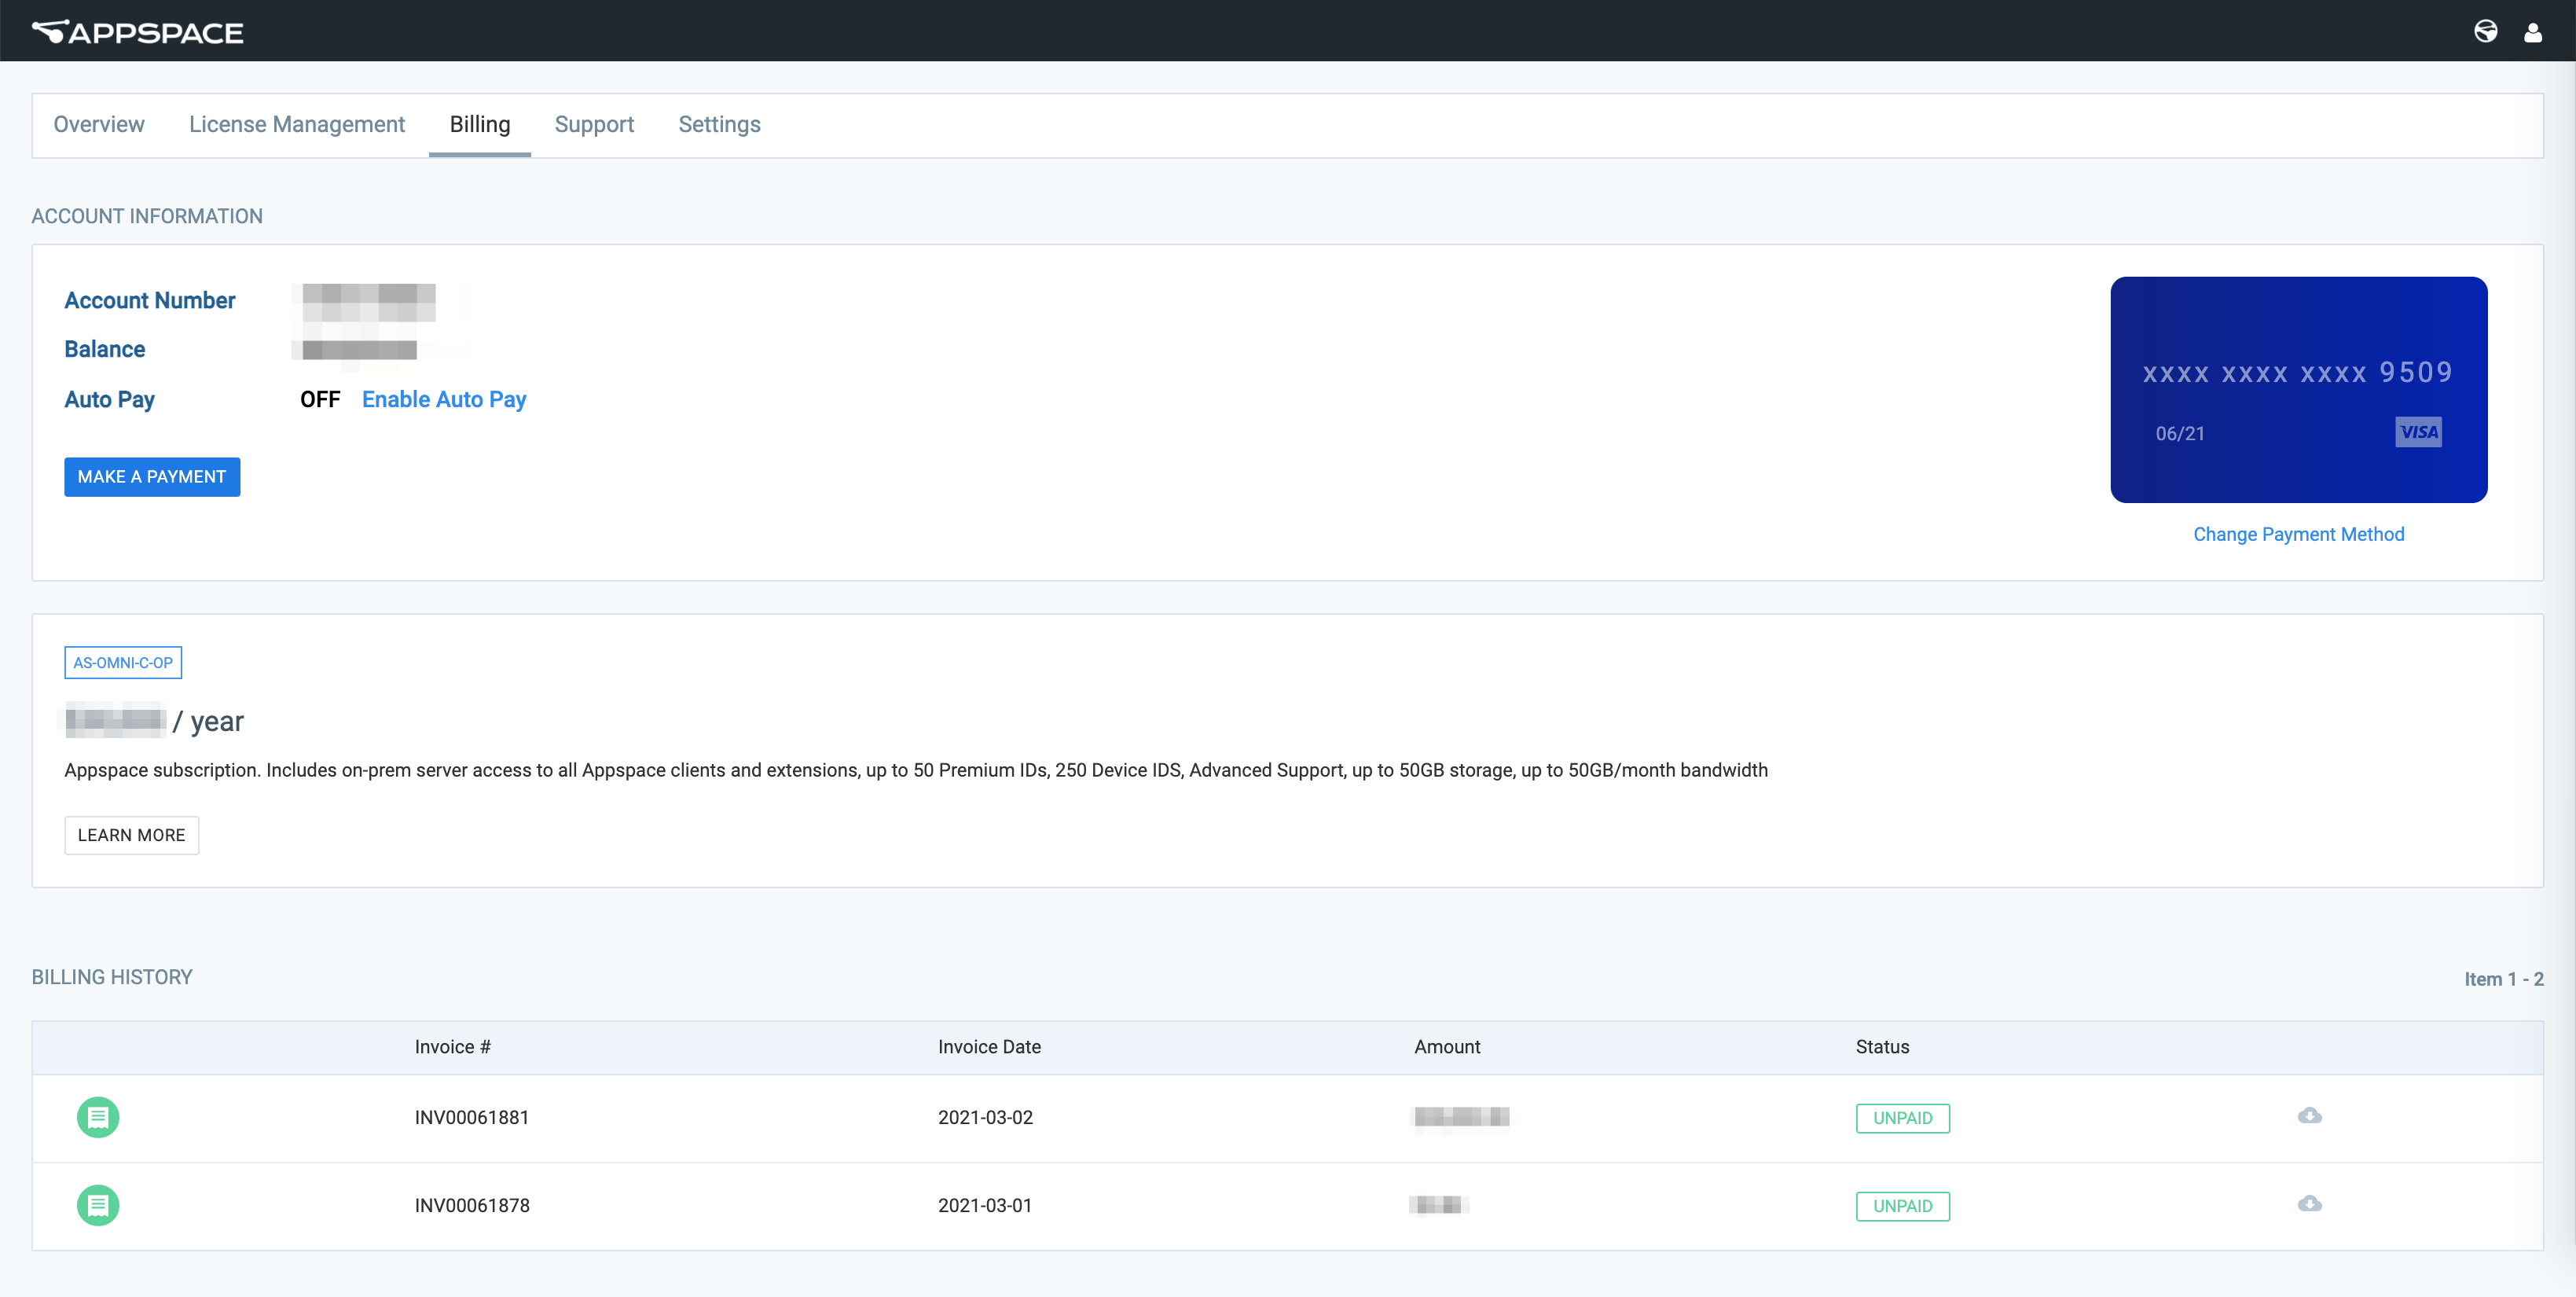
Account Information
The Account Information section, displays the following organization’s account information:
- Account Number
- Balance
- Auto Pay status
You may also perform the following actions:
- Enable Auto Pay – Allows automatic payments on invoices, either monthly or yearly based. This option is only available once a payment method (credit or debit card) has been added.
- Make a Payment – Allows specific invoices to be selected and payment to be made immediately. This option is available when the Auto Pay feature is disabled.
- Change Payment Method – Add or update the payment method that is used to make payments. Currently only supports debit or credit cards.
Change Payment Method
Follow the instructions below to add or update the payment method that is used to make payments. Currently, only debit or credit cards are supported as payment methods.
- Click the Change Payment Method link, and enter the following debit or credit card details to make payment.

NoteIf an existing payment method is available, the latest payment method added will be used to make payments. - Once done, click SUBMIT.
Make a Payment
Follow the instructions below to pay an unpaid Appspace invoice.
- Click MAKE A PAYMENT, and select to pay the current balance (all unpaid invoices), or specific invoices from the Amount drop-down menu.
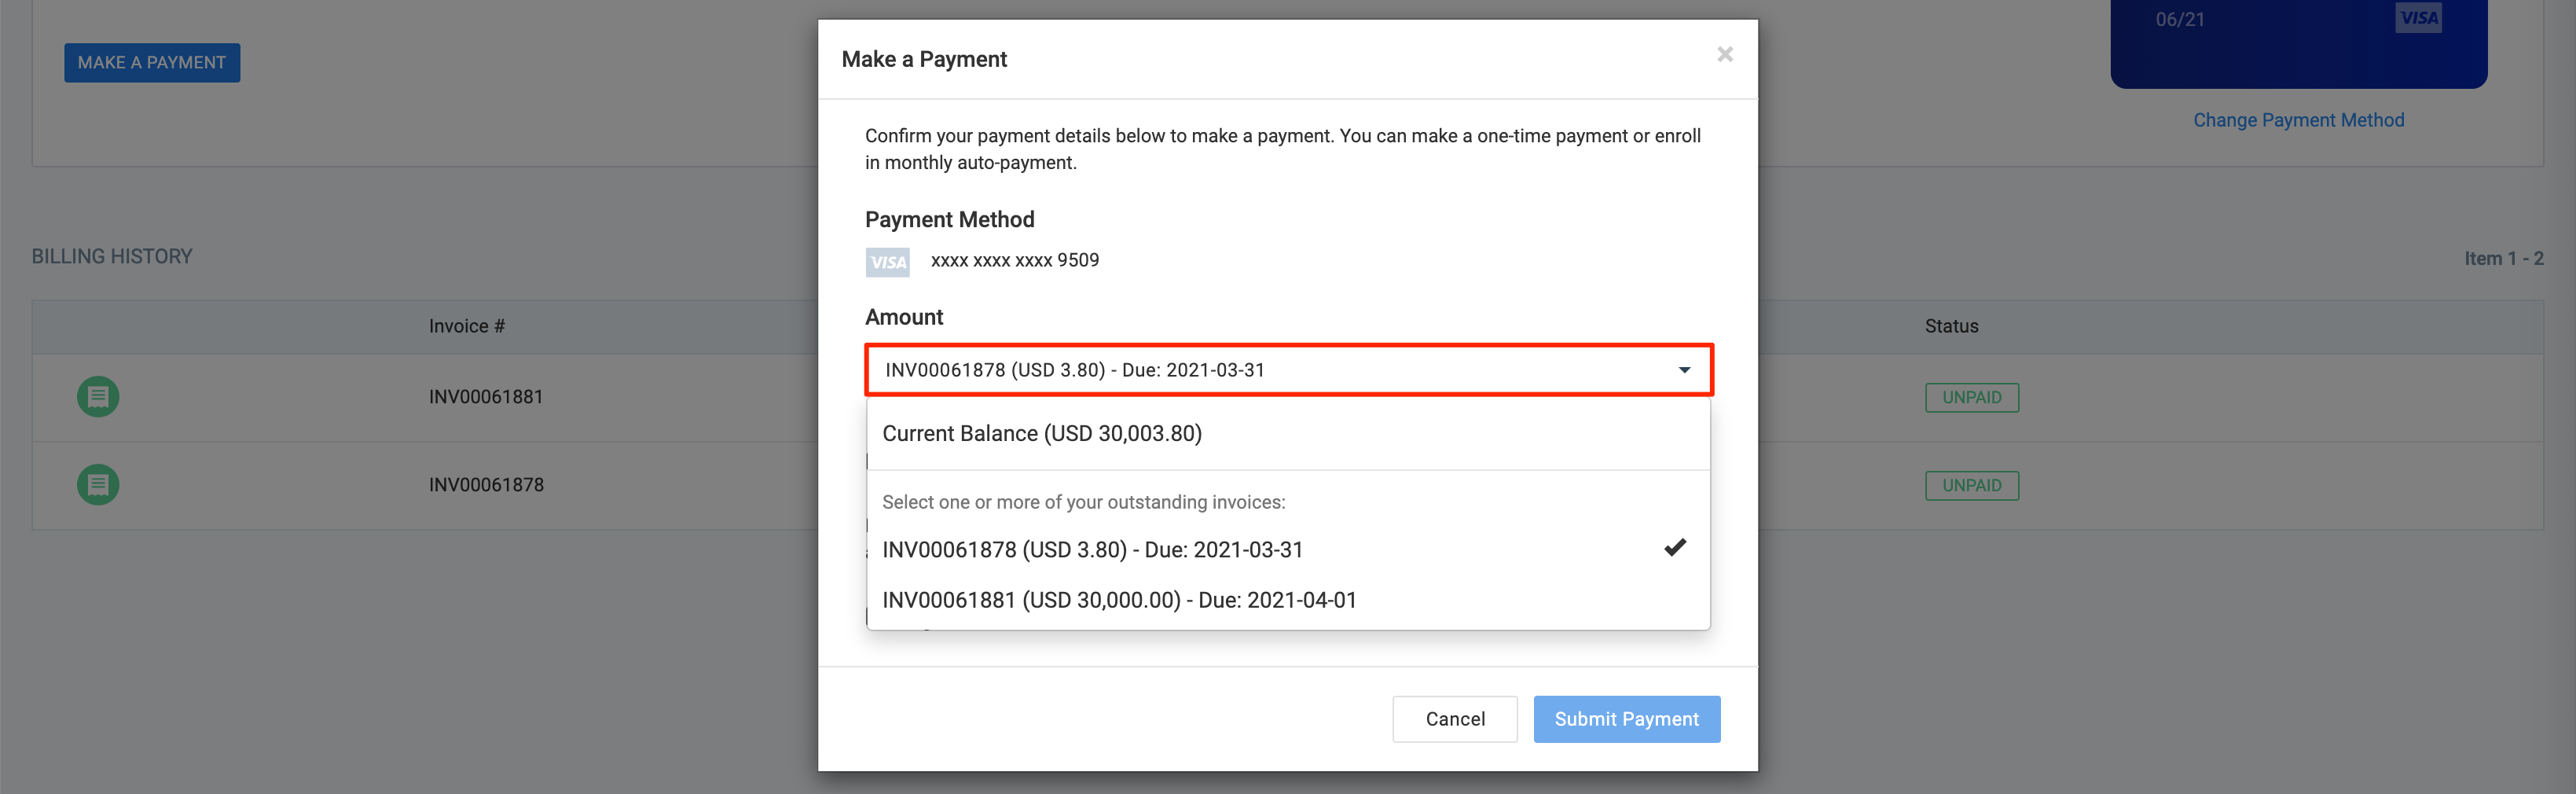
- Optionally, you may disable the auto pay function that is enabled by default, by sliding the Enable Auto Pay slider to DISABLED. This option may not be available if auto pay has been enabled previously.
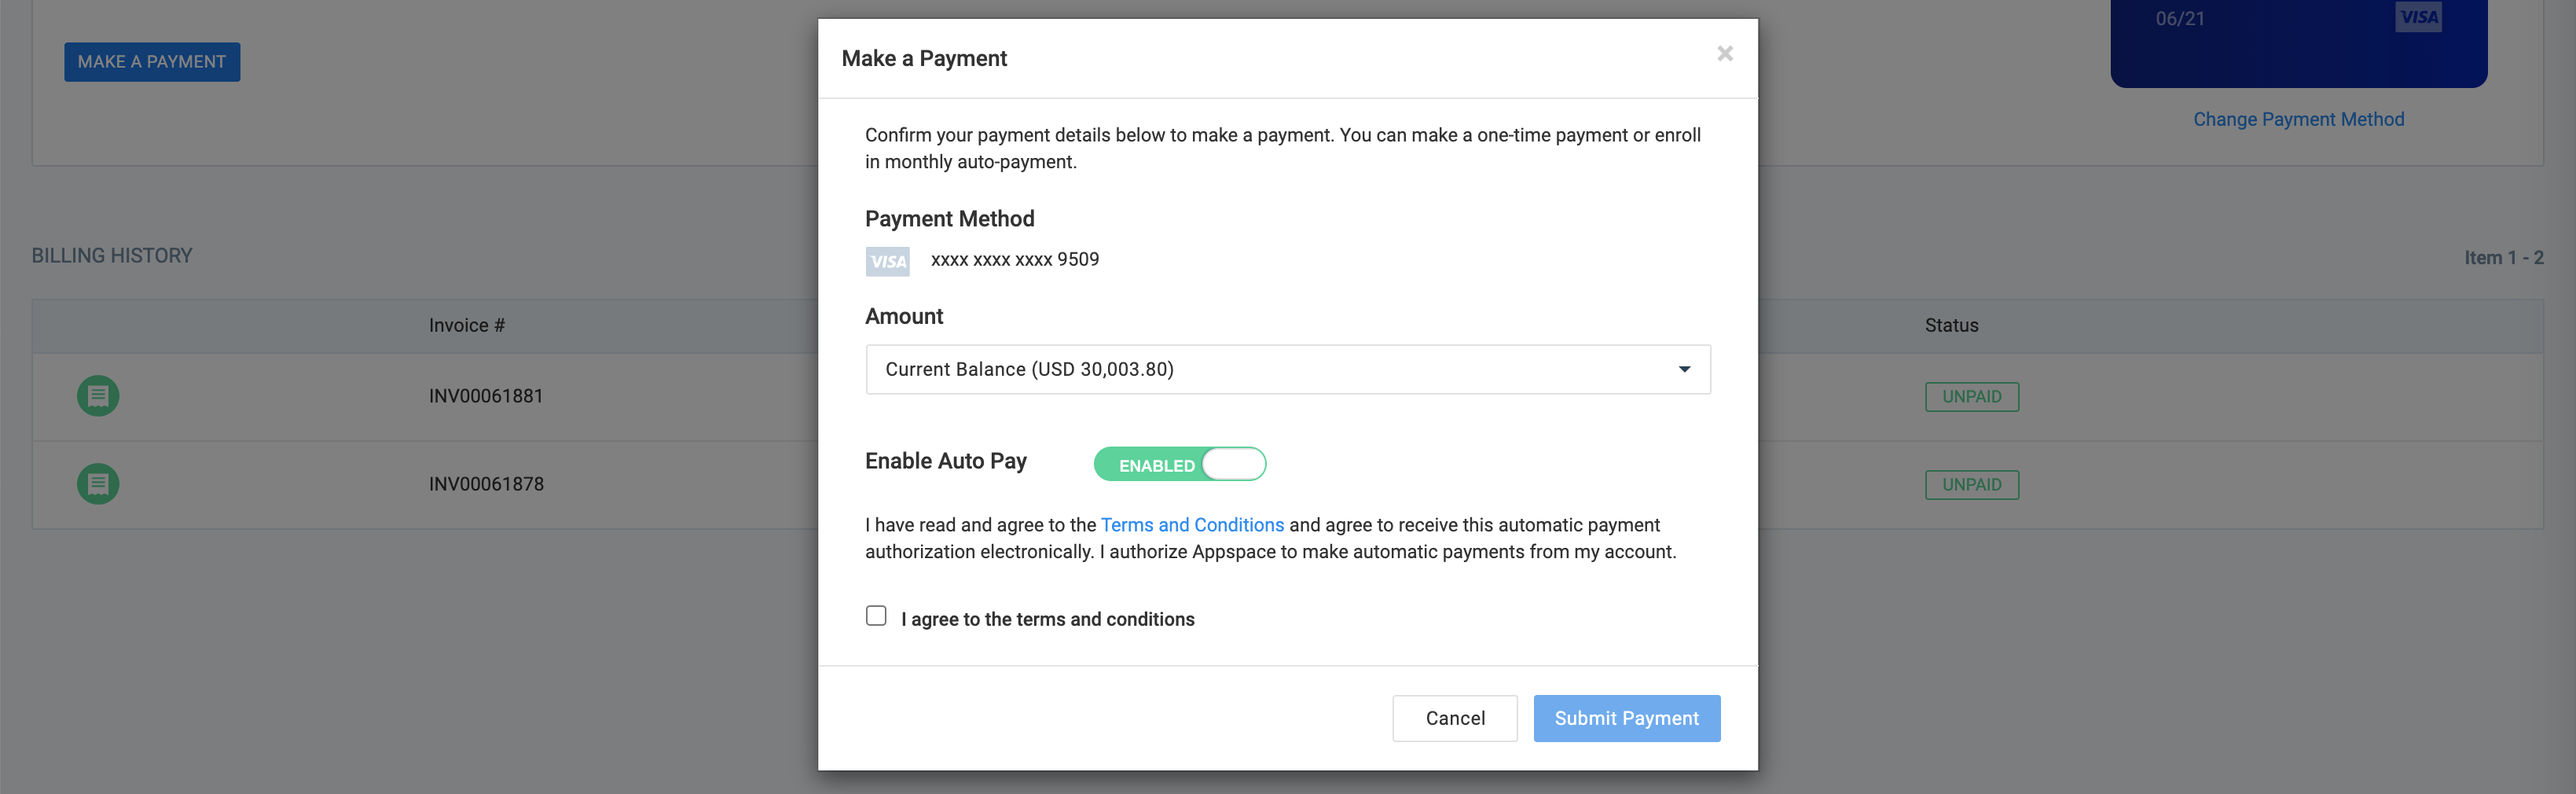
NoteIf auto pay is enabled, any unpaid invoices will be automatically selected and paid during the next invoice due date. - Once done, check the I agree to the terms and conditions checkbox, and click Submit Payment to proceed with the payment.
Subscriptions
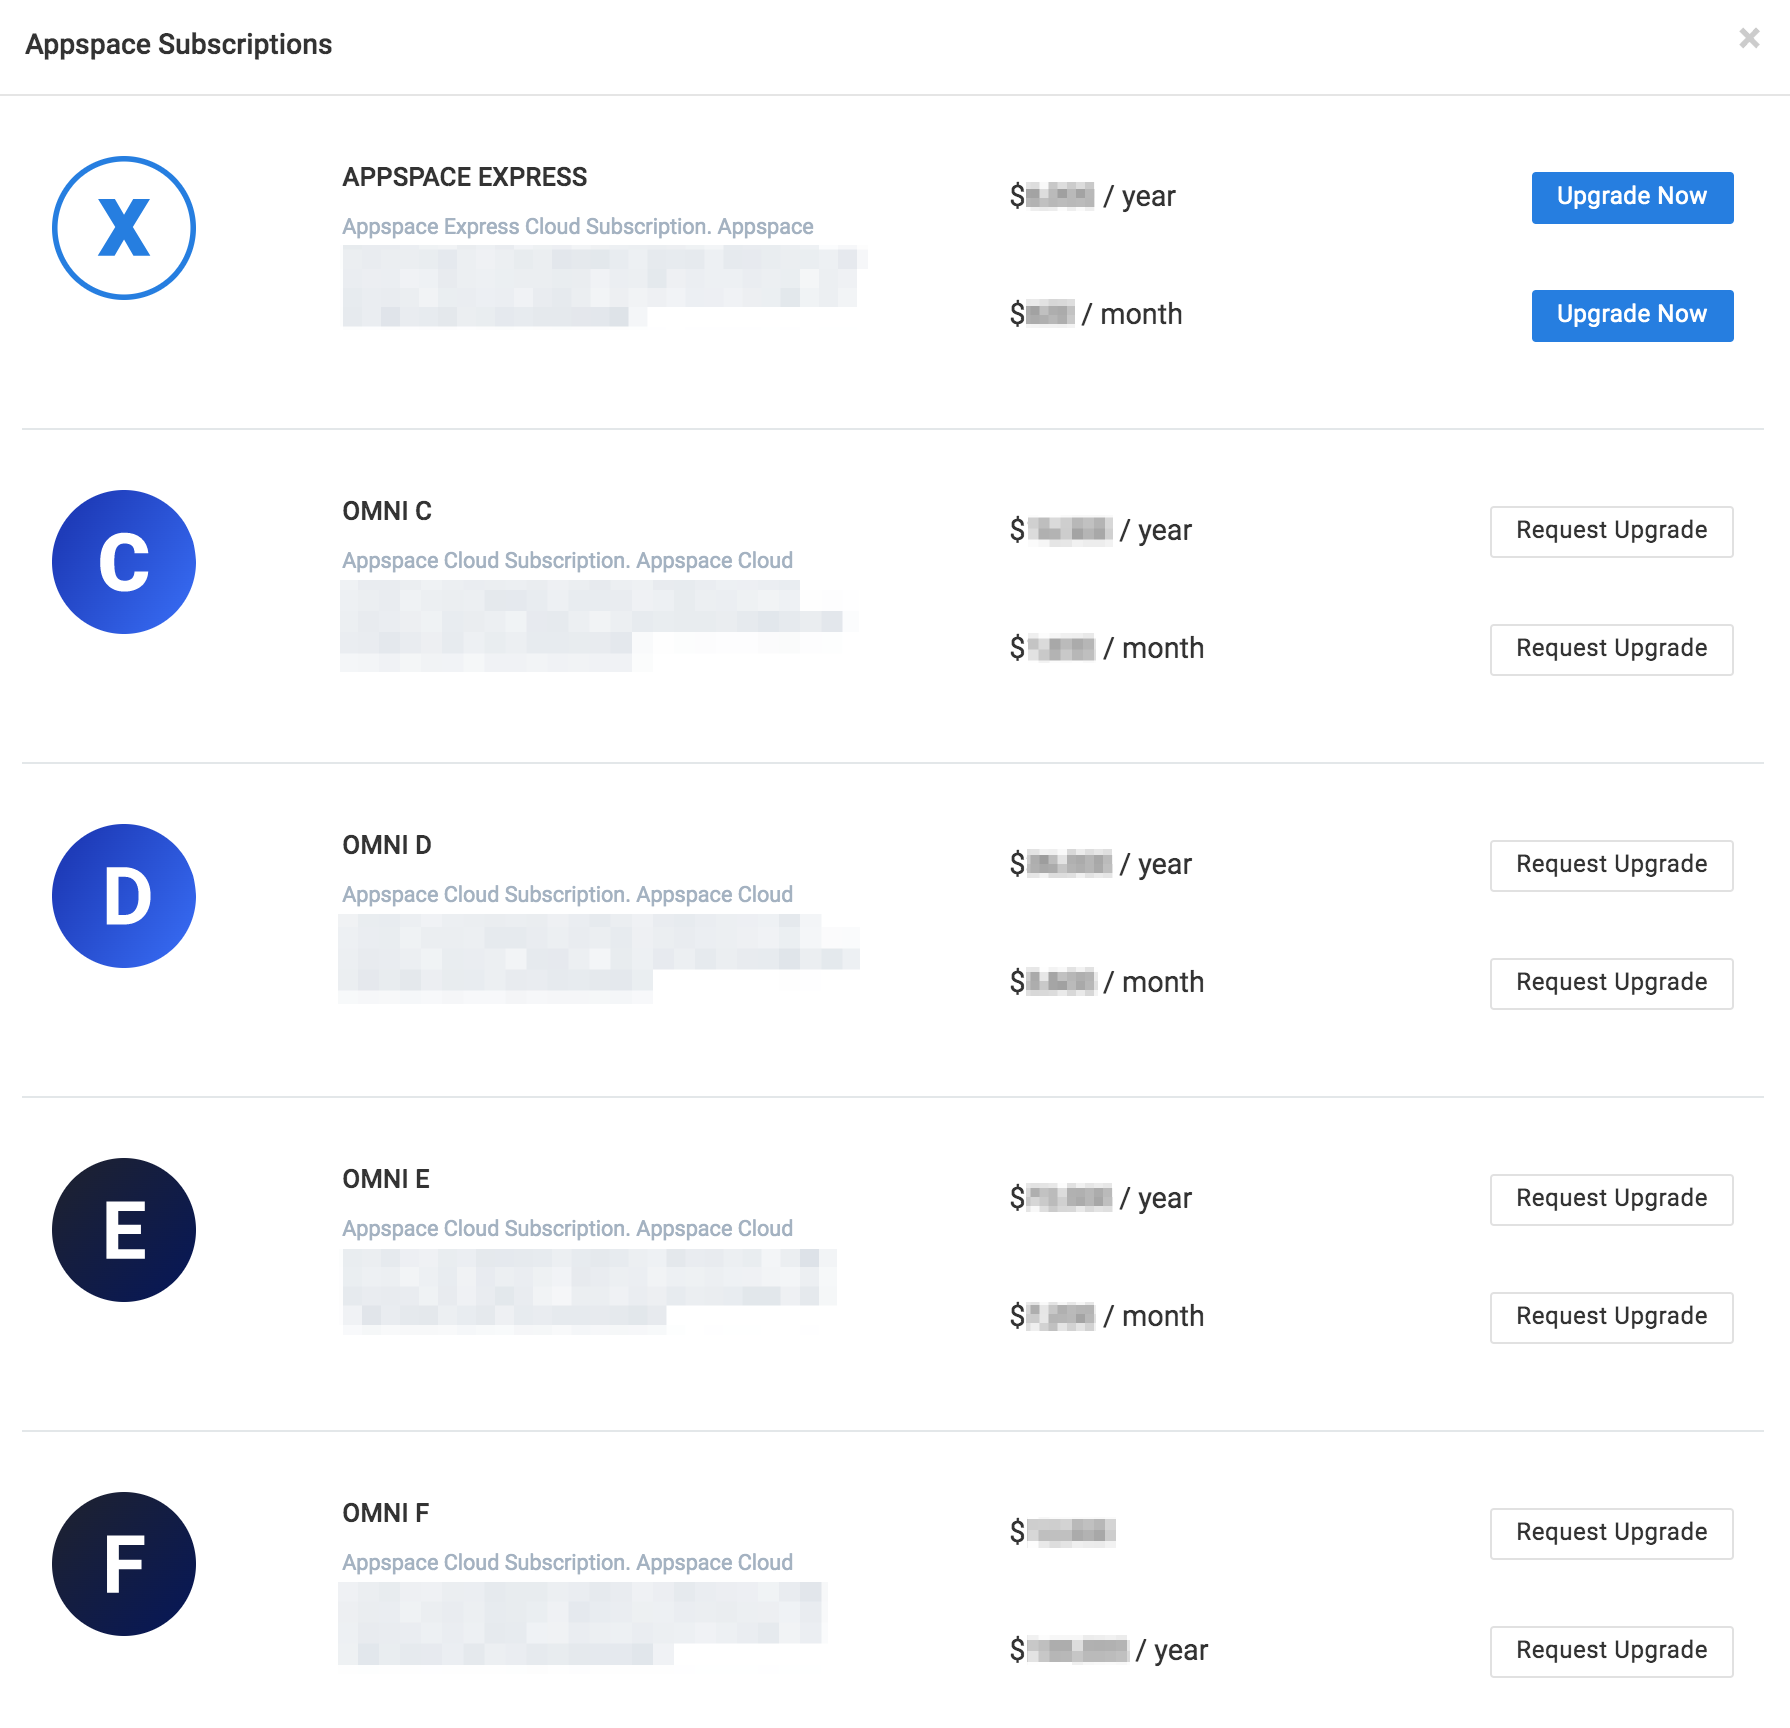
The Subscription section displays the Appspace subscription plan that you are currently on. Depending on the subscription plan, a CHANGE SUBSCRIPTION button may appear, allowing the subscription to be upgraded or to request an upgrade.

Clicking the CHANGE SUBSCRIPTION button, launches the Appspace Subscription window displaying the list of subscription upgrade options.
Billing History
In the Billing History section, Account Owners can find a list of invoices and amount that is billed to their account, including if it has been paid or not. These invoices can also be downloaded and printed for physical record keeping.
Settings
The Settings tab allows Cloud Services Account Owners to configure various Appspace platform settings.
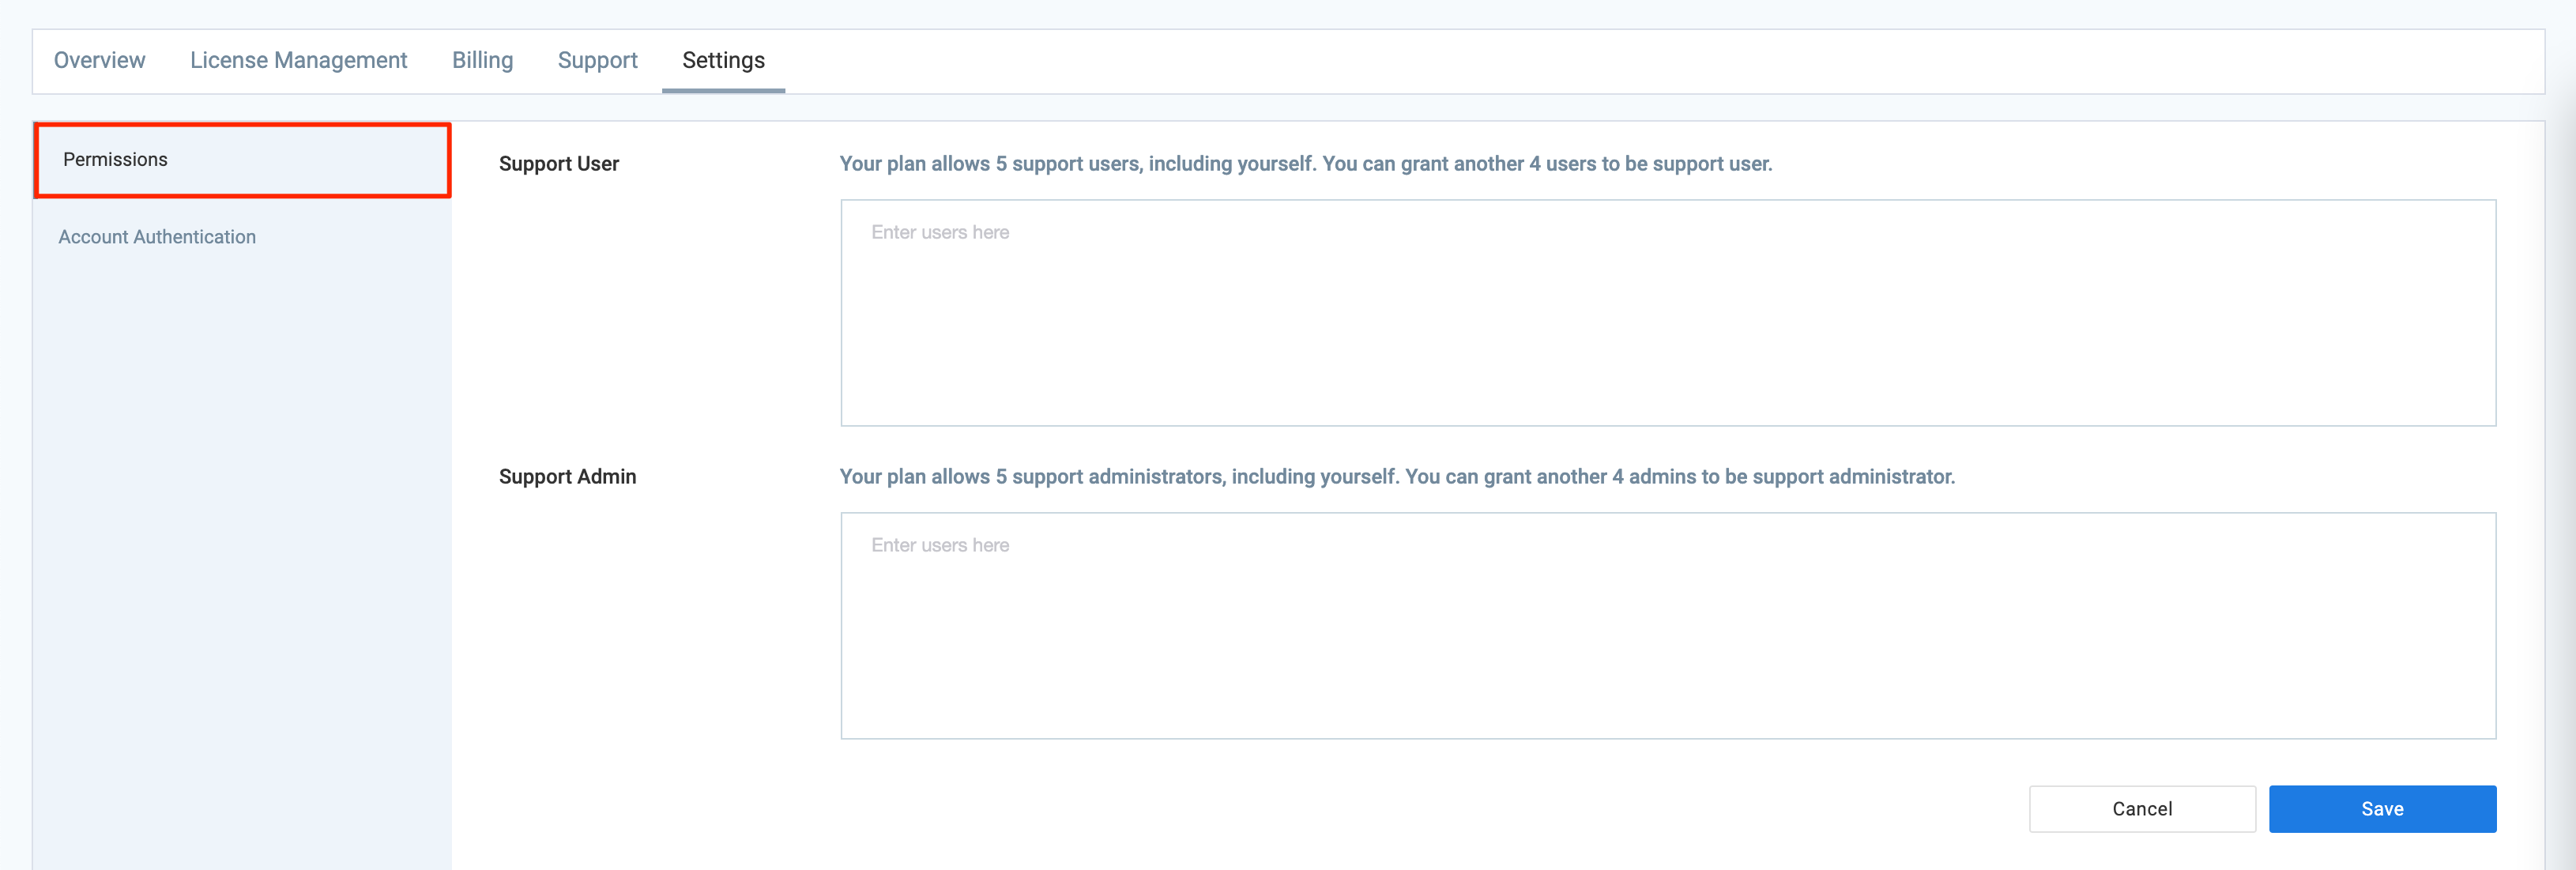
Permissions
The Permissions tab allows Account Owners to grant specific users access to the Support tab on this site.
Account Authentication
The Account Authentication tab allows Account Owners to configure Single Sign-On (SSO) for Appspace Cloud.
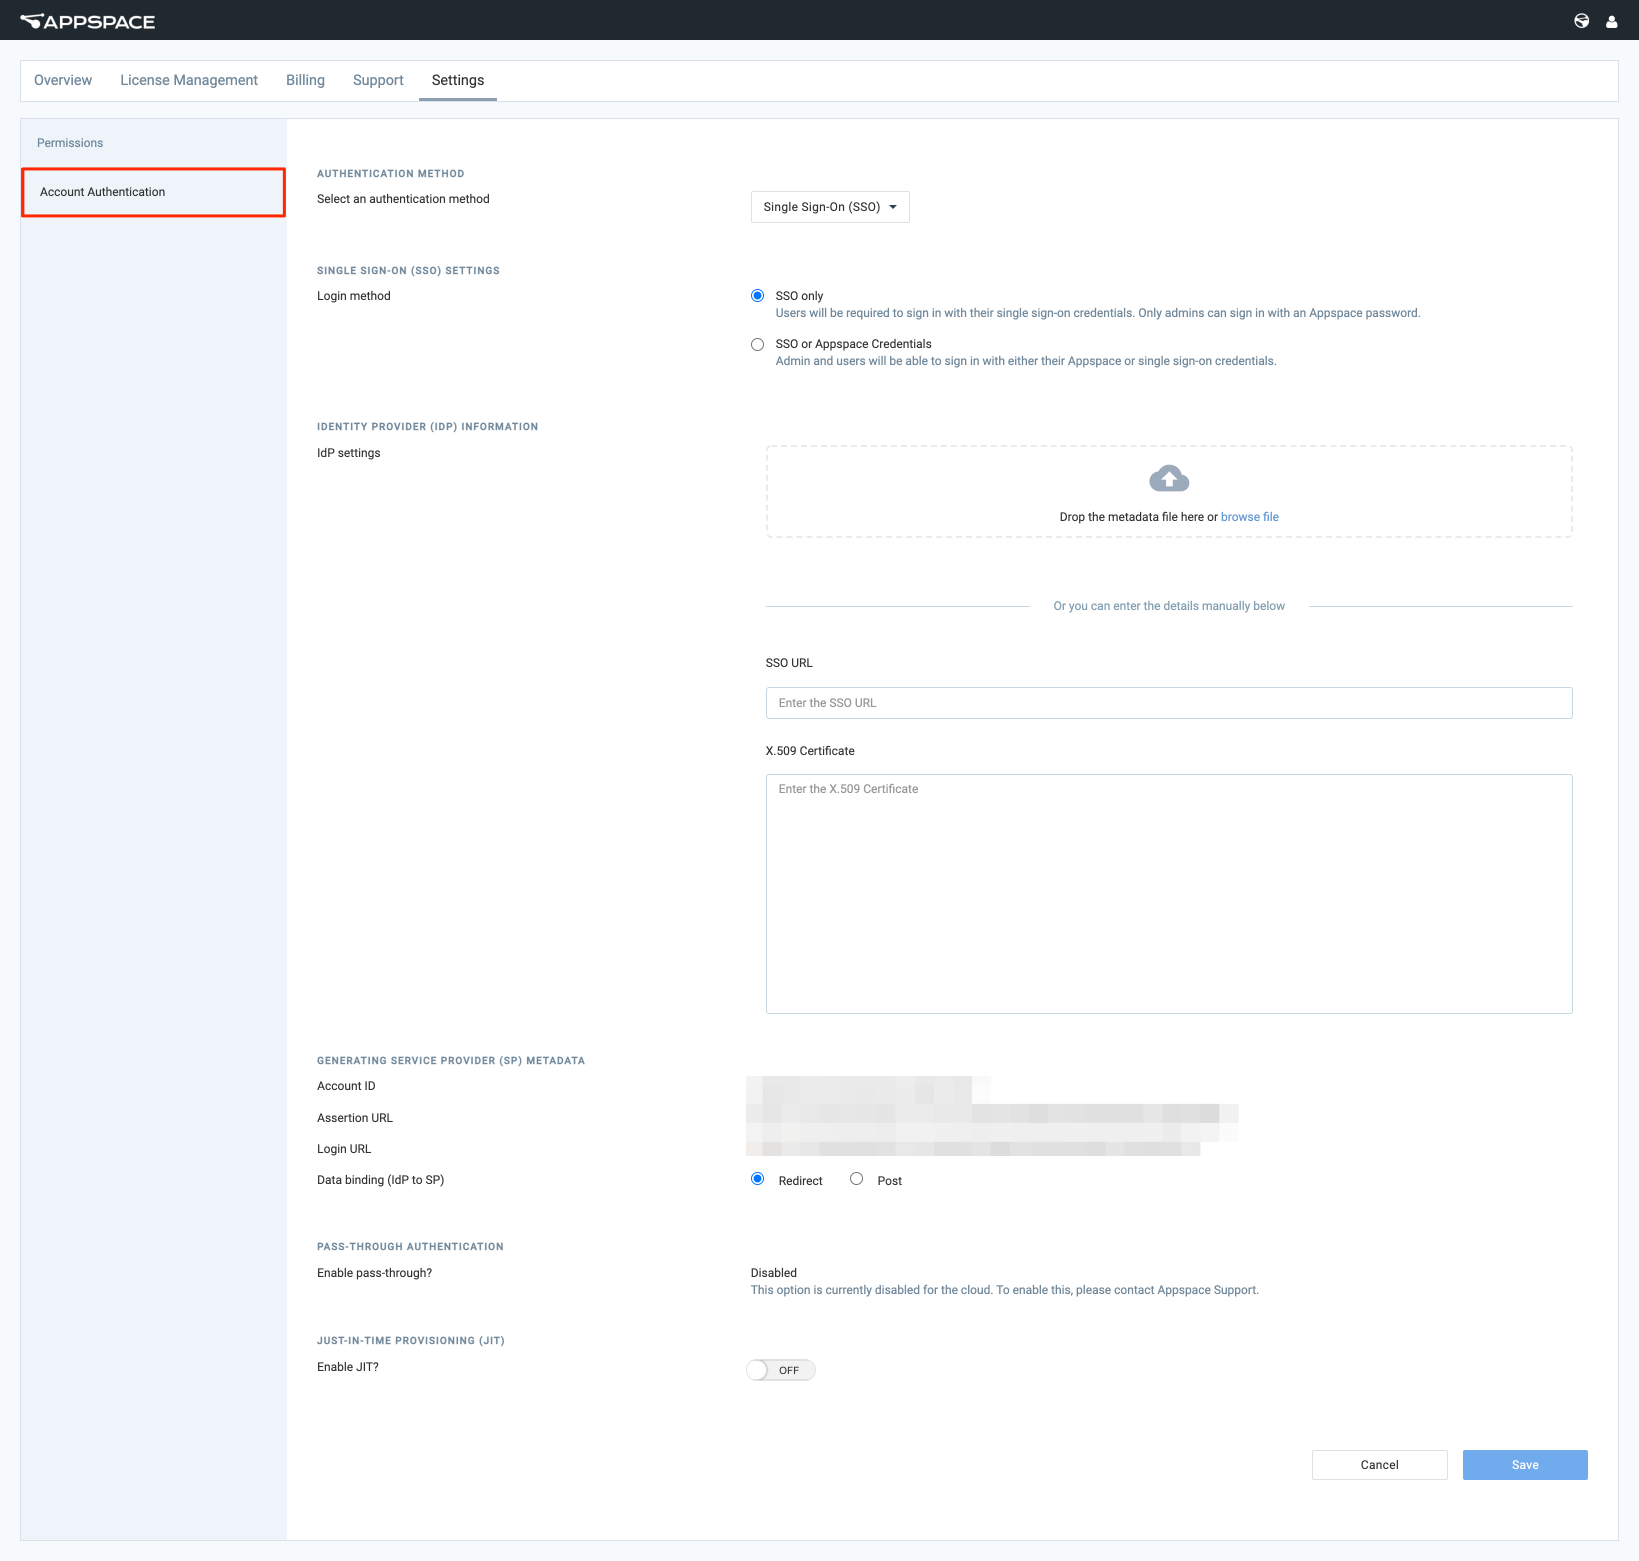
Once the SSO configuration is saved, a “View Metadata” button is displayed beside the Save button. Users may copy the metadata or download it.
Refer to Configure Single Sign-On (SSO) & Just-in-Time (JIT) for Appspace Cloud configuration information.
Support
The Support tab in the Appspace Account Management Portal, allows Cloud Services Account Owners to create and manage their own support tickets.
The Support page features 3 main components, which are:
-
Case History – View support ticket history. This page also has a button to create new support tickets, and a button to access the Appspace Knowledge Center.
You can view all the cases that you created via this portal or through the phone, including open and resolved tickets. Cases are automatically sorted by “last updated” first, and can be filtered by status.

-
Create Case – Create support tickets via a simple and easy form. You can include an attachment (all file types) per new ticket.

-
Case View – View case activity for each case.
- You can interact with the Appspace Support team by adding comments or uploading attachments. However, the comments cannot be edited, or deleted once you save it.
- Only the Appspace Support team may resolve or close a case.
- You can upload one attachment for each comment you make for a case.
- All file types are accepted for an attachment.

-
Live Chat
Live Chat is part of Support’s latest offering to paid subscription customers, which allow Cloud Services Account Owners and users with access to the Support page, to communicate directly with our support teams via the Account Management Portal.

- Live Chat can be accessed from the navigation bar, or invoked through a case thread when discussing the case specifically.
- Support personnel can create new cases based on a chat session, if the chat session isn’t related to an existing case.
For more information about the Support Portal, please refer to the Contact Appspace Support article.
Was this article helpful?