The Appspace Employee View is your organization’s central location for employees to view corporate content that is published to them, and access 3rd party applications utilized within the company. Therefore, it is only natural that organizations would like to customize their Employee View to match their organization’s branding, and the ability to enable only the features used within the organization, giving it that personal touch.
These customizations can be done within the Appspace console by an Account Owner, or Location Admin by navigating to the Settings > App Configuration > Employee Portal tab from the Appspace menu. Configuration settings that are applied here would affect the Employee View, Appspace Employee View for Mobile, and also the Visitor Kiosk card.
This article provides instructions to configure the Employee View theming options and 3rd-party application links that are utilized within the organization:
Prerequisites
- Account Owner or Location Admin roles in Appspace.
- Appspace Platform User license.
Configure Branding
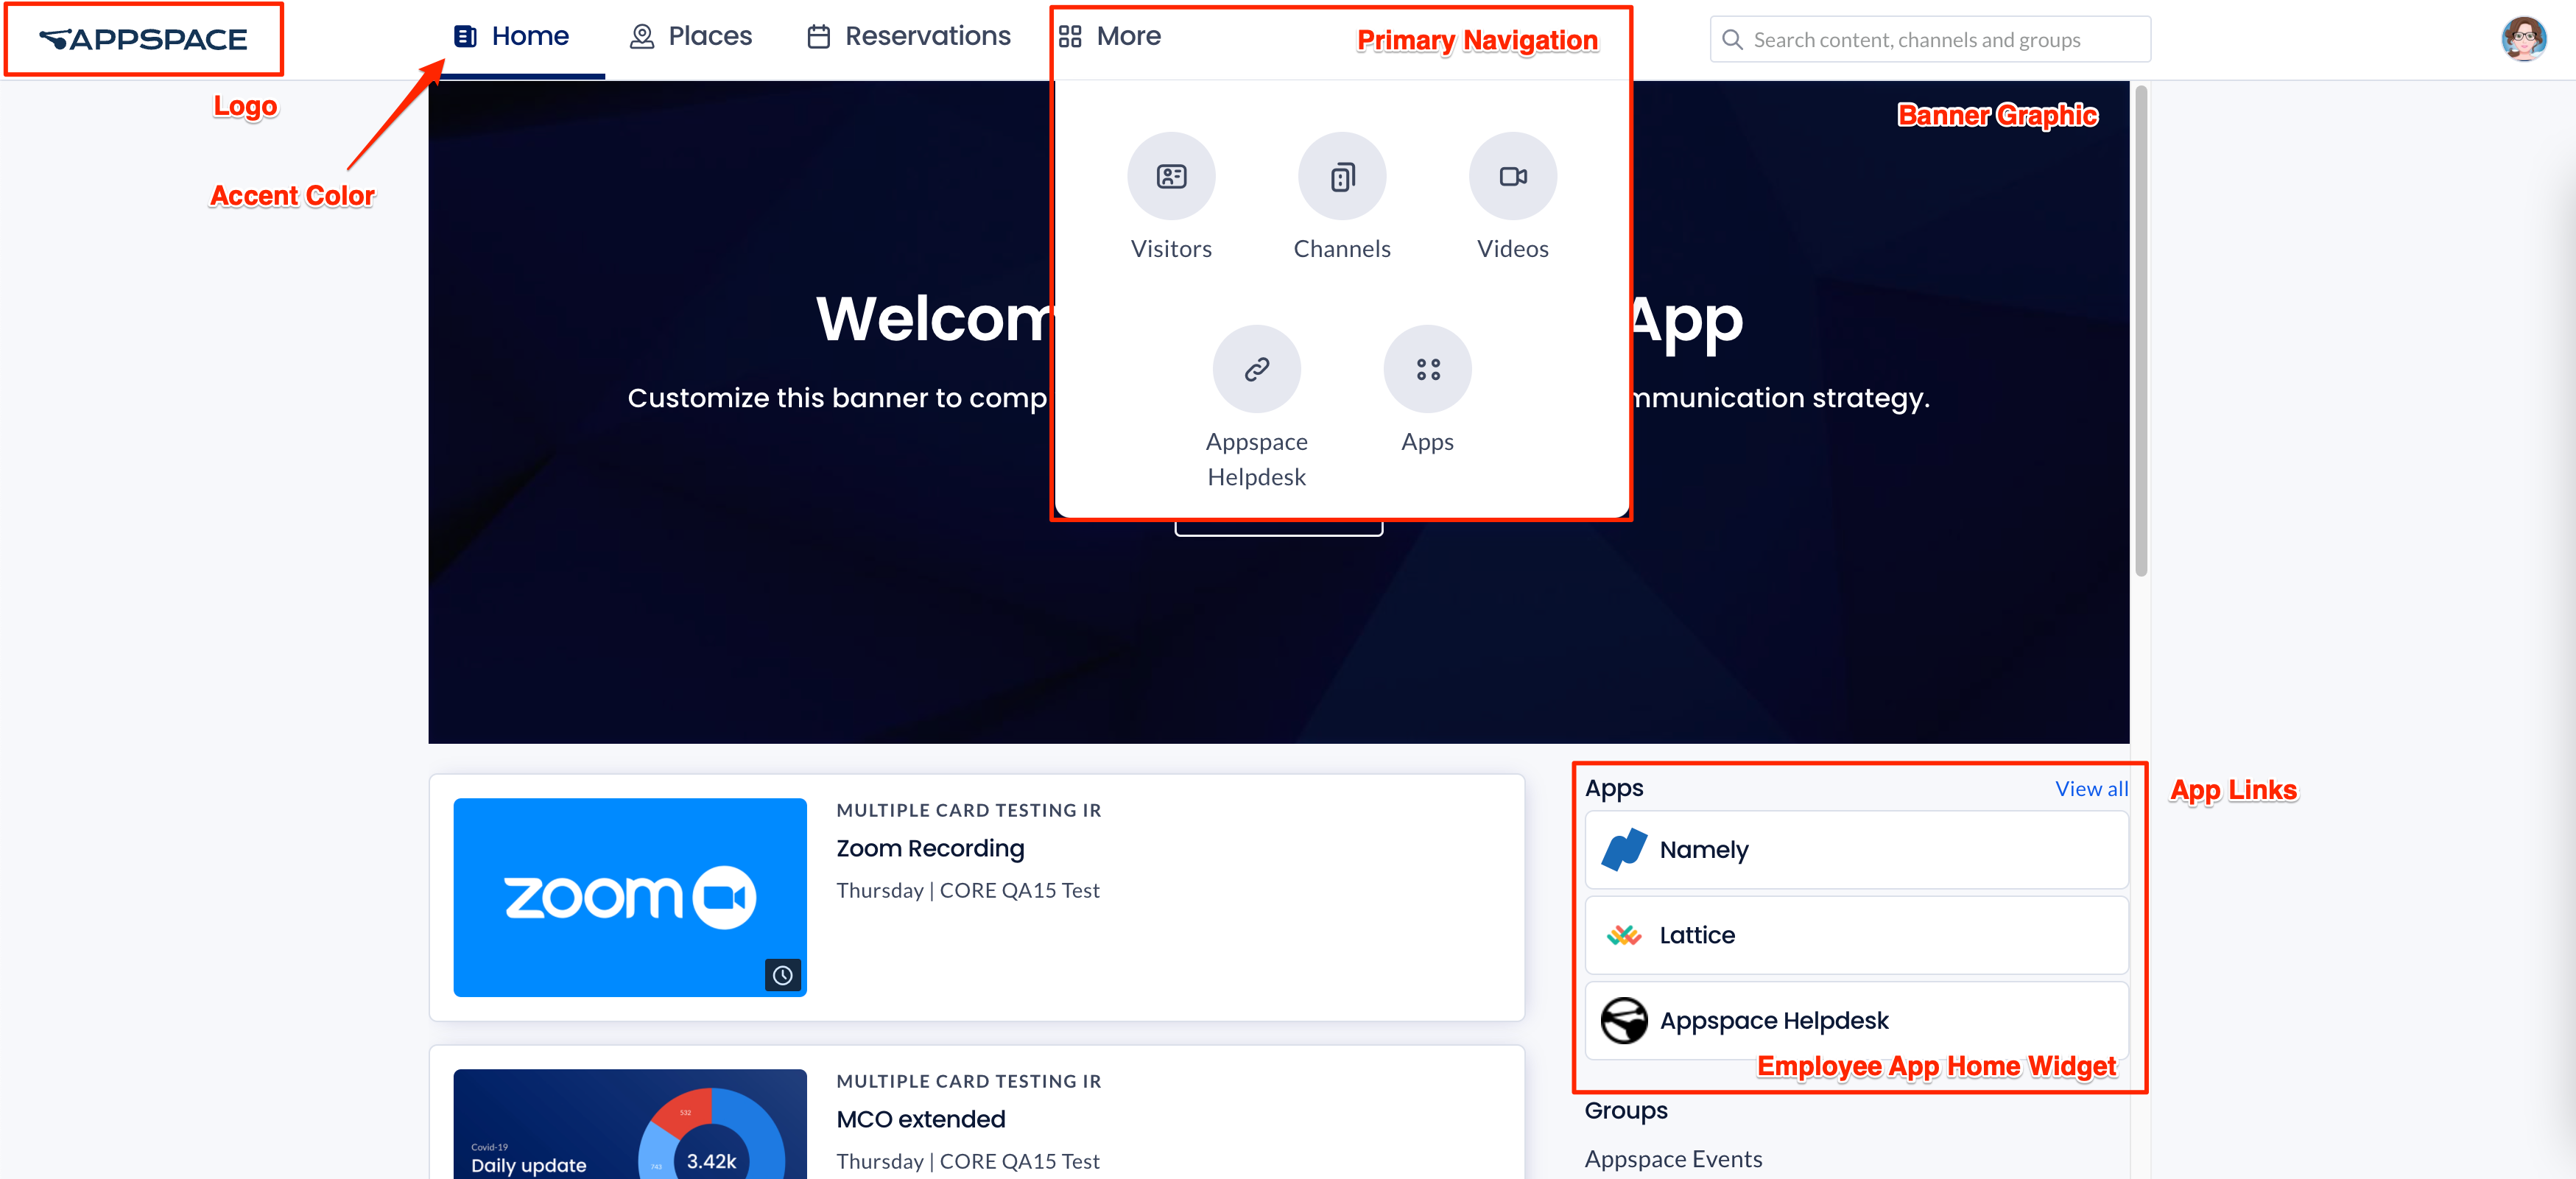
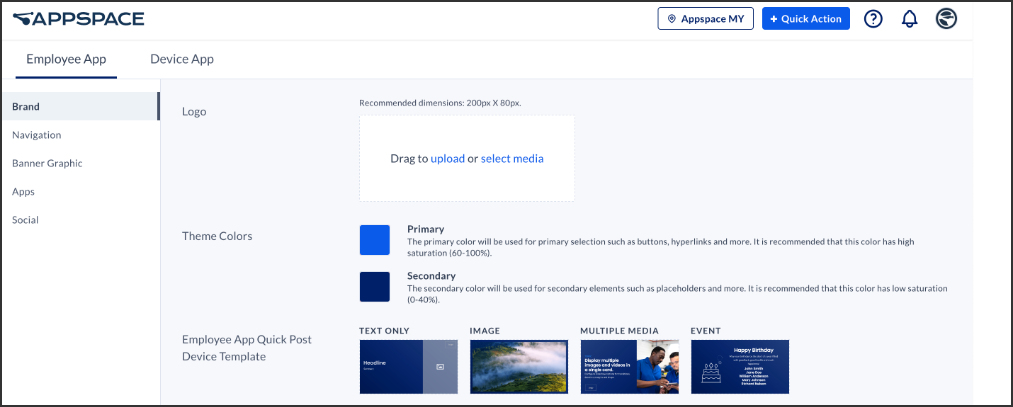
The Brand side panel allows you to customize the branding for your organization. You will be able to upload a logo, or select one from the library, and even change the accent color to create a consistent theme throughout all communications.
Follow the instructions below to configure the branding for the Employee View, Appspace Employee View for Mobile, and also the Visitor Kiosk card.
- Log in to the Appspace console.
- Click the ☰ Appspace menu, and click Settings > App Configuration.
- Click the Employee View tab, and click Brand from the side panel menu.
Note
The Employee View tab and Device App tab may only be viewed by the Account Owner. If the user is a Location Admin, only the Device App tab is shown.
-
You may perform the following branding options:
- Logo – Upload or select a logo from the Library to be displayed on the Employee View. Recommended dimensions: 200px X 80px.
- Theme Colors – Select your desired theme colors and personalize both your primary and secondary colors to align with your brand. – New Feature
ImportantThe Secondary theme colour feature is currently behind a feature flag and unavailable to the public.
- Employee View Quick Post Device Template – The Employee View Quick Post Device template comes in four different types. You can select a template for Text Only, Image, Multiple Media or Event.
Configure Navigation
The Navigation side panel allows you to configure the layout and interfaces displayed in the Employee View. From here, you can customize what is shown on the Employee View and what is viewable by your user to coincide with your organizations branding strategy.
Follow the instructions below to configure the sections to be displayed on the Employee View.
- Log in to the Appspace console.
- Click the ☰ Appspace menu, and click Settings > App Configuration.
- Click the Employee View tab, and click Navigation from the side panel menu.
- Set the desired location and user to preview the navigation in the Employee View.
- To configure the Section, click the ellipsis of the section, and select one of the following actions:
-
-
- Home
- Videos
- Channels
- Places & Reservations
- Visitors
- Concierge
- Apps Links
-
Configure Banner
The Banner Graphic side panel allows you to customise a banner graphic which is displayed on the Employee View. You can display media content, a webpage, or even the last posted content as the banner.
Follow the instructions below to configure the banner graphic displayed on the Employee View.
- Log in to the Appspace console.
- Click the ☰ Appspace menu, and click Settings > App Configuration.
- Click the Employee View tab, and click Banner Graphic from the side panel menu.
- Select the banner to be displayed from the Select Content Type drop-down menu:

- None
- Default – Displays the default “Welcome to the Employee View” banner.
- Media – Displays media content as the banner.
- Media – Upload or select the media from the Library to be displayed as the banner.
- Webpage – Displays a webpage as the banner.
- URL – Enter the webpage URL.
- Last Content Posted – Displays that last posted content to the Employee View as the banner.
Configure Third-Party Apps
The Apps side panel allows you to configure an application link for third-party apps to be displayed on the Employee View. You can choose from a wide selection of apps ranging from enterprise messaging apps, HR and business focused apps, to even entertainment apps. You can also create your own application link for a service not found in the list.
Follow the instructions below to configure links to third-party applications.
- Log in to the Appspace console.
- Click the ☰ Appspace menu, and click Settings > App Configuration.
- Click the Employee View tab, and click Apps from the side panel menu.
- Click the + Add button to create an App link.

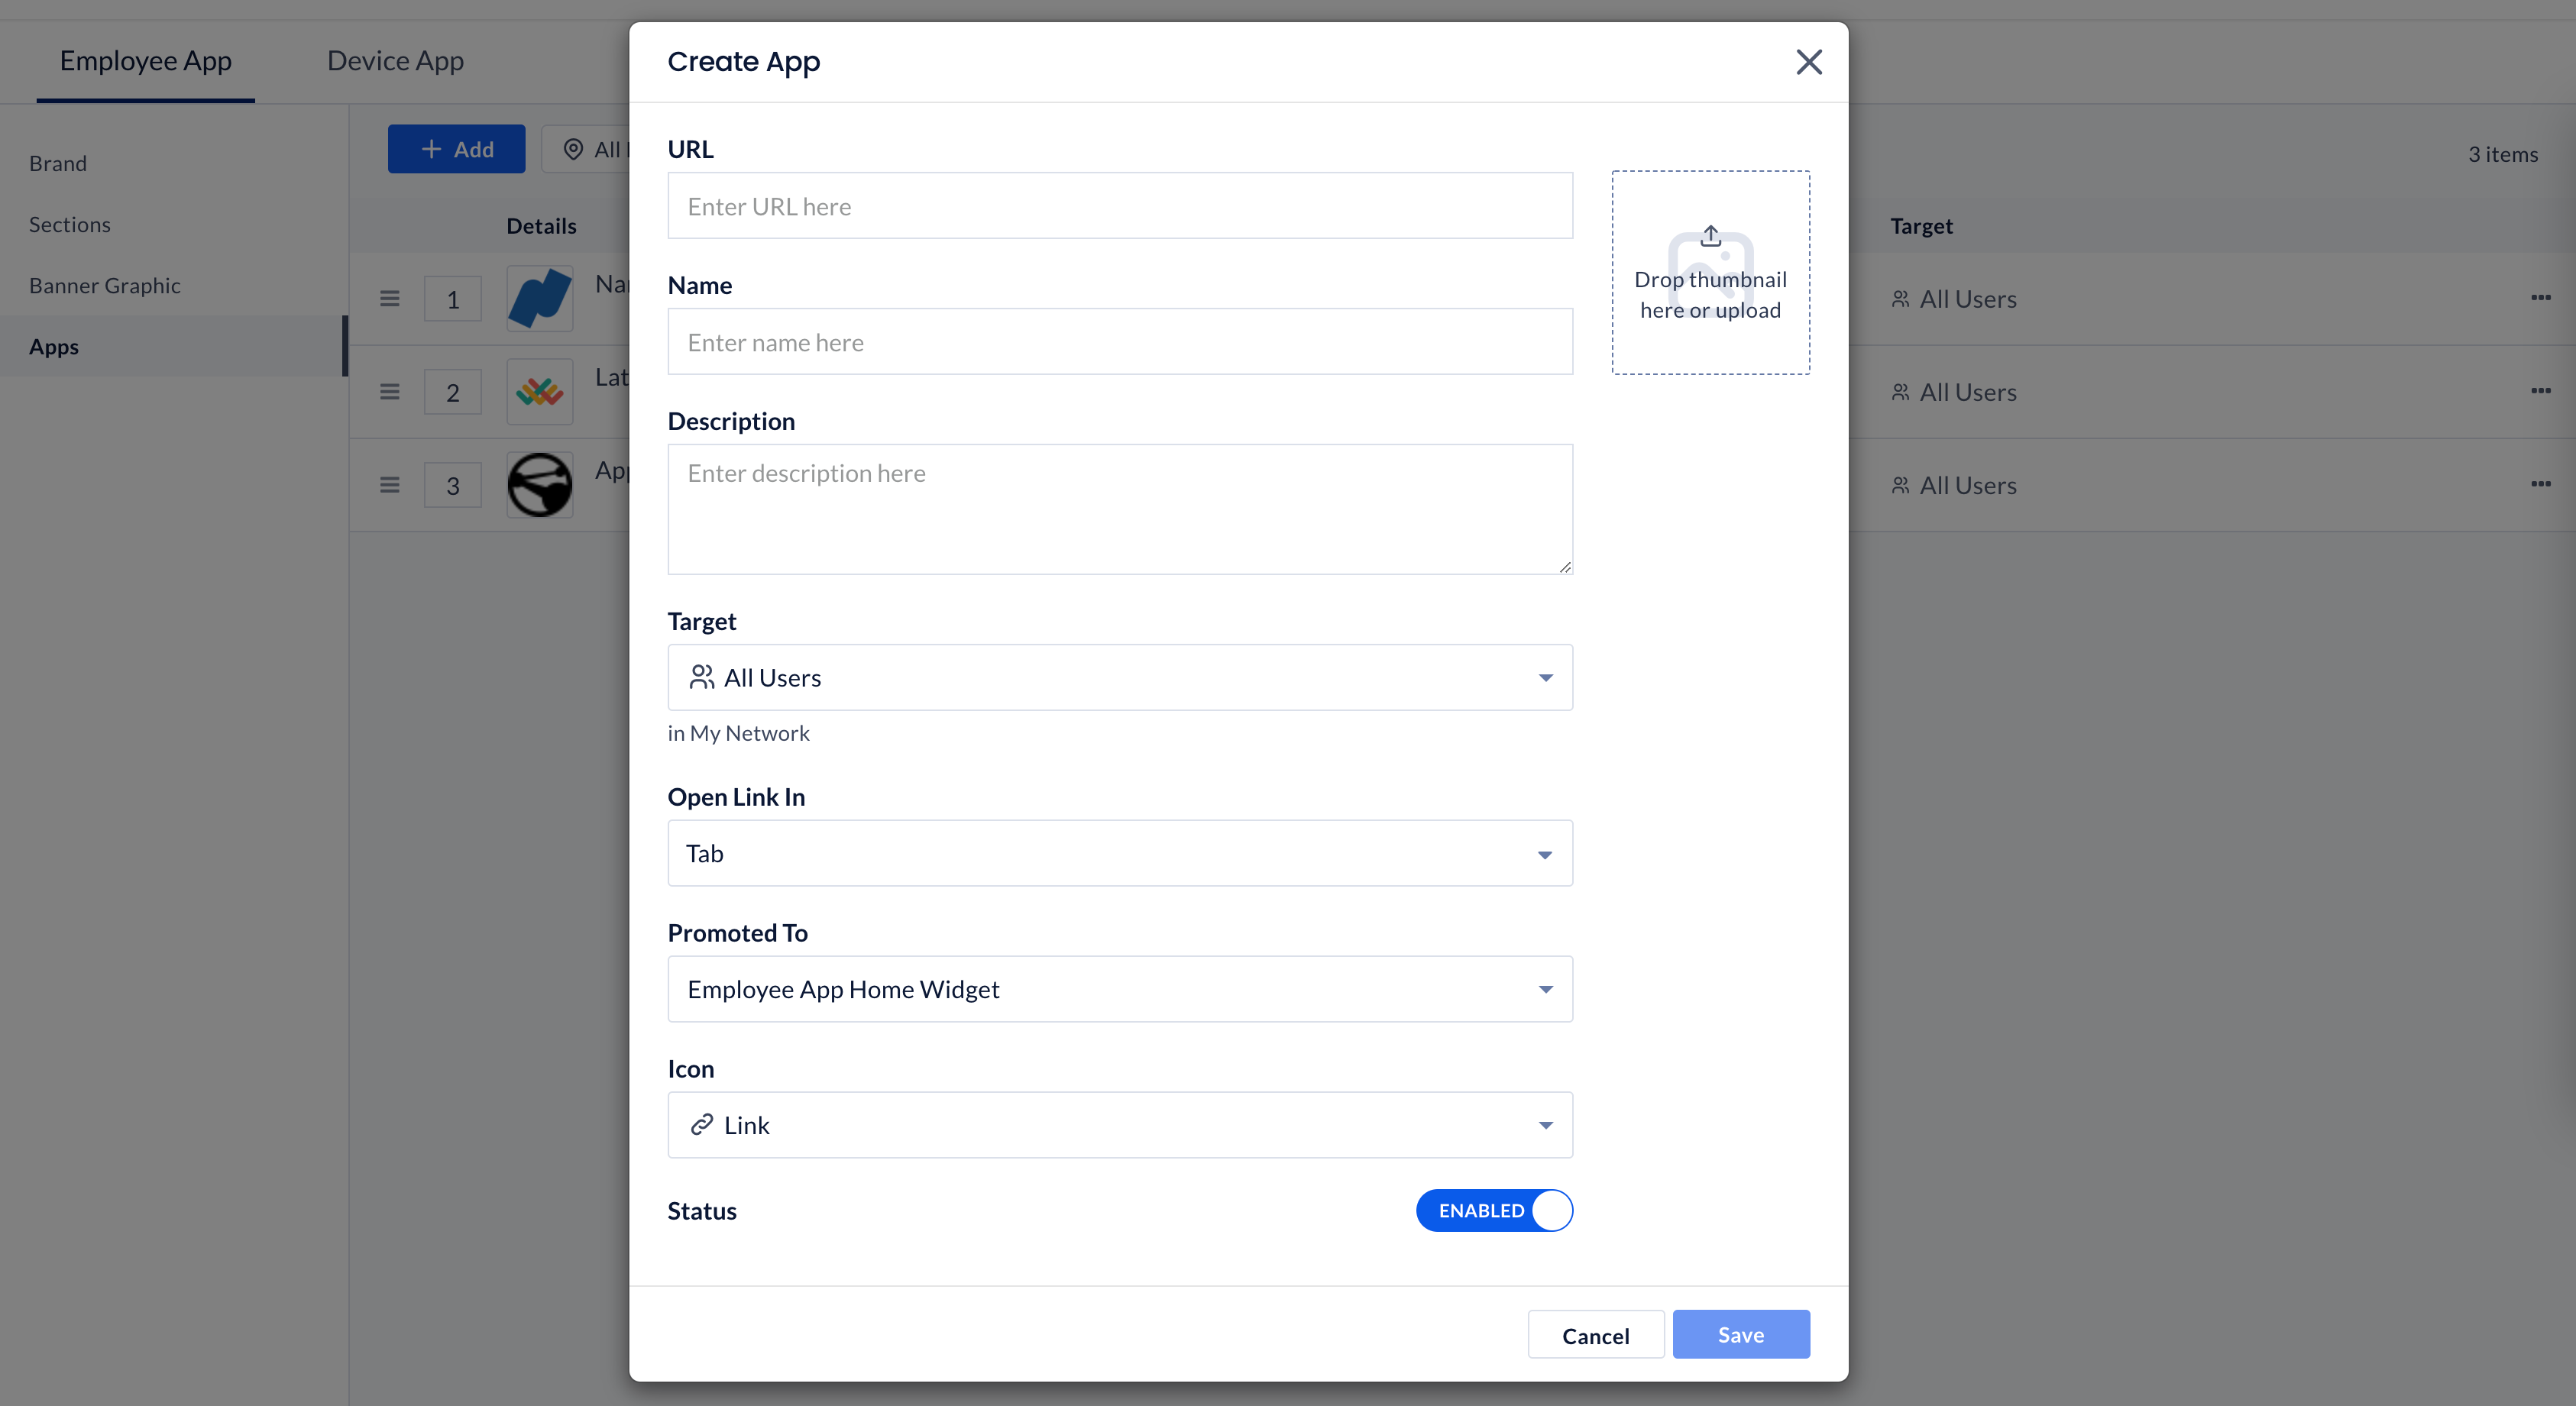
- In the Create App window, enter the following app link information:

- URL – Enter the URL of the application.
NoteApplication Link URL Format:
- We recommend using “https://” URLs for the application links.
- The system automatically appends “https://” to the URL, if “www.domain.com” or “domain.com” is entered.
- Name – Enter the name of the application.
- Description – Enter the description of the application.
- Logo – Upload the logo of the application.
NoteThe Name, Description, and Logo will be automatically populated if the application link URL contains the relevant metadata, however this can changed to provide better context.
- Target – Define if the application is available to everyone, or specific users, user groups, or users within a certain location.
- All Users (default)
- Specific Users, Groups or Locations
- Add Users, User Groups, or Locations – Define the specific users, user groups, or users within the location that can view the application.
NoteYou may only add locations and sub-locations that you have access to.
- Add Users, User Groups, or Locations – Define the specific users, user groups, or users within the location that can view the application.
- Inject Query Parameters – Define the user attributes to be passed along to the 3rd party app via the URL link.
- User Email – Appends the Email of the user.
- User Name – Appends the First and Last Name (combined) of the user.
- User Id – Appends the User ID of the user.
- User Membership – Appends the User Group of the user.
- User Home Location Id – Appends the Home Location ID of the user.
- User Home Location Name – Appends the Home Location name of the user.
- Open Link In – Define where the application is launched.
- Tab (default) – Launches the application within the Employee View.
- Inline App – Launches the application in the native browser.
- Native Browser – Launches the application in the native iOS or Android app. Only applicable on the Appspace Employee View for Mobile.
- Promoted To – Configure where the application is displayed.
- Employee View Home Widget (default) – Displays the application on the Home screen.
- Primary Navigation – Display the application within the More menu.
- Icon – Select the application icon displayed in the Primary Navigation from the drop-down menu.
- Status – Slide the toggle switch to enable or disable the app link.
- URL – Enter the URL of the application.
- Once done, click Save.
Configure Reactions, Share and Comments On Posts
The Social side panel allows you to configure the Reactions, Share and Comments Settings for the post to be shown on the Employee View.
If the post’s Reactions Settings are enabled, you be able to do the following:
- See the reactions button.
- Open the reactions selector by hovering or long pressing the reactions button.
- Add, edit or remove a reaction on the post.
- See the reactions counter.
- Open the reactions modal by clicking or tapping the reactions counter.
If the post’s Comments and Share Settings are set enabled, you will have the ability to add a comment and share the post with other people. For more information on post reactions, comments, and share, refer to the Create Quick Post in Employee View.
Follow the instructions below to configure reactions, share and comments on posts.
- Log in to the Appspace console.
- Click the ☰ Appspace menu, and click Settings > App Configuration.
- Click the Employee View tab, and click Social from the side panel menu.
- To configure reactions, comments, and share, select your preferences from the drop-down menu.

- Default On – By default, reactions will be enabled in all channels and posts.
- Default Off – The reactions will be disabled by default, however the channel level settings may be changed to configure each channel differently.
- Always On – All posts will always be able to get reactions.
- Always Off – All posts will be unable to get reactions.
Was this article helpful?


