Configure Crestron Devices For Digital Signage

Introduction

In this guided path, you will learn how to configure Crestron Airmedia 2.0 devices such as the AM-200, AM-300 and Mercury to display Appspace channels for digital signage.

The Crestron AirMedia 2.0 solution combines conferencing and collaboration tools all in a single device. The Appspace App is also built into the console interface and can be configured directly without the need to download any additional software. Content and data are downloaded and either streamed or cached in the device’s integrated browser. 

You can configure to run the digital signage in one or both the modes listed below:

  • Signage in Standby: Signage is displayed full screen while the conference room is not being utilized and the device is in idle mode during standby.
  • Signage as a Background: Signage is activated when the room becomes occupied and the Crestron conference collaboration tools are in use. When this mode is enabled, the Appspace App is displayed on the larger part of the screen, while the Crestron information is maintained at the bottom.

Prerequisites

Before you begin, ensure that you have the following prerequisites met:

  • You will need Location Admin permissions as a minimum.
    • Location Admin permissions gives you the ability to manage devices and users for a location.
    • As a Location Admin, you can register and configure devices.
    • Location Admin permissions are granted by an admin of the location, which can either be the Account Owner or other Location Admins.
  • You have a compatible Crestron device to configure.
  • You have created one or more playlist channels that will be used for the device.
    • Option 1: If you want to use the same channel for both Signage in Standby and Signage as a Background modes, you can just create a single playlist channel and name the channel as desired.
    • Option 2: If you want to create two separate channels for each display mode
      • The channel that runs in the background must be named: crestron-occupied
      • The channel that runs in standby must be named: crestron-unoccupied
For more in-depth information about supported content and channel formats that can be displayed on these devices, please read the following how-to guide: Configure digital signage in conference rooms for Crestron AirMedia/Mercury.

Configure the device for digital signage

In order to use the compatible Crestron device for digital signage, it must first be configured to enable the Appspace App.

To enable the Appspace App on the device, simply follow the steps below.

Access the Crestron Web Console

Enter in the Crestron device IP address in your web browser to access the Crestron web console.

Click the Settings icon on the top right corner, and select Device Administration. Then click Sign In and enter the Crestron device credentials.

Note: Some Crestron devices such as the Crestron Mercury will show the login screen immediately.

1

Enable Appspace Integration

In the side panel menu, click APPSPACE, and enable the Appspace Integration. With the integration enabled, you will need to set your Appspace account location so that the device knows where it should be registered.

You have two options under Account Location:

  • Public Cloud – Select this if you are on Appspace cloud.
  • Private Instance – Select this if you are on Appspace private cloud.

Note: Users on private cloud may use the cloud option, or contact Appspace if you would like a privately hosted URL.

From here, you can enable one or both of the signage display modes:

  • Signage in Standby
  • Signage as a Background
2

Signage in Standby mode

With Signage in Standby mode enabled, the Appspace App runs full screen when the device is inactive and asleep.

For this mode, the option for Occupancy Based With Signage must also be selected for Signage in Standby to work correctly.

To configure the standby mode, navigate to AVF > System > Power Settings, and select Occupancy Based with Signage from the Standby dropdown menu.

3

Signage as a Background

With Signage as a Background mode, the Appspace App takes over the majority of the screen, while the Crestron conference collaboration tool is maintained at the bottom.

Note: By default there is a grey overlay that is positioned over the Appspace Content which functions to provide better visibility for the Crestron conference meeting room information on display.

The grey overlay can be disabled in the Crestron web console, by disabling the Show Background Overlay option in AVF > Touch Screen and Display.> Display Customization.

4

Save the changes on the device

Click on  Save Changes to reboot the device. Once the device configuration has been set, you can begin the process of registering it with your Appspace account.

5

To the next part

Now that you have configured the Crestron device to enable the Appspace App to display digital signage, you can start the device registration process. The next part of this guided path shows how you can use the onscreen registration code to register the Crestron device with Appspace.

Register the Crestron device to Appspace

With the Crestron device enabled for digital signage, it can now be registered with Appspace using the onscreen registration code. 

To register the device with Appspace, simply follow the steps below.

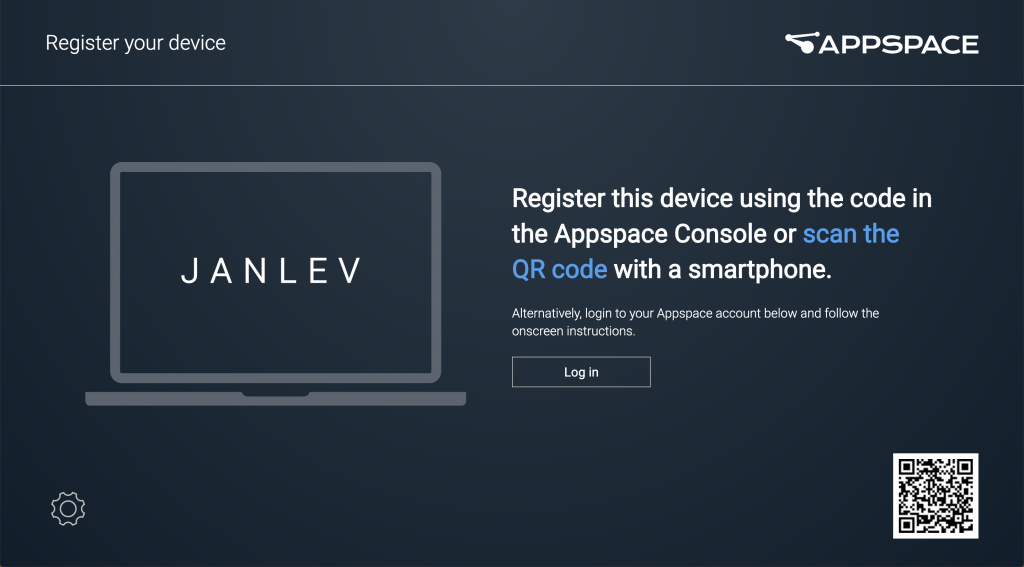
Idle mode and registration code

Now that signage mode is enabled, you will need to register the Cisco device with Appspace.

Let the device enter its half-wake state to activate signage mode for the first time. Doing this will launch the Appspace App displaying the 6-character code. You will need this registration code to register the device with Appspace.

1

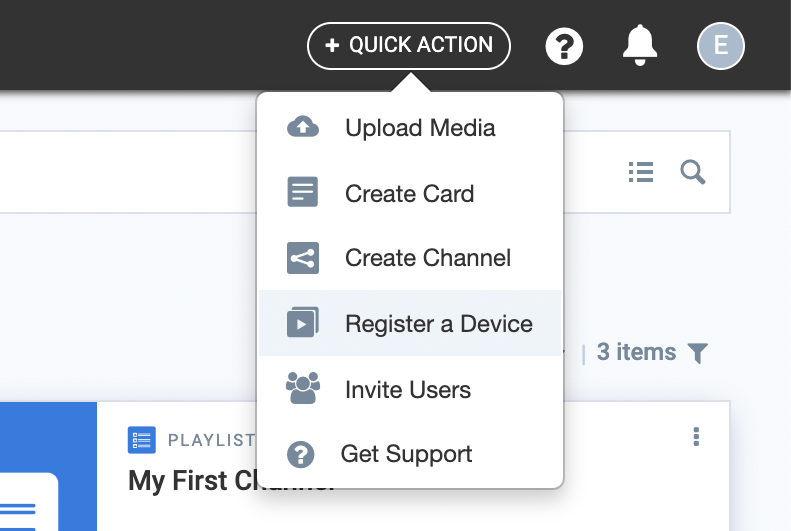
Appspace device registration form

Click on Register a device from the Quick Action menu.

2

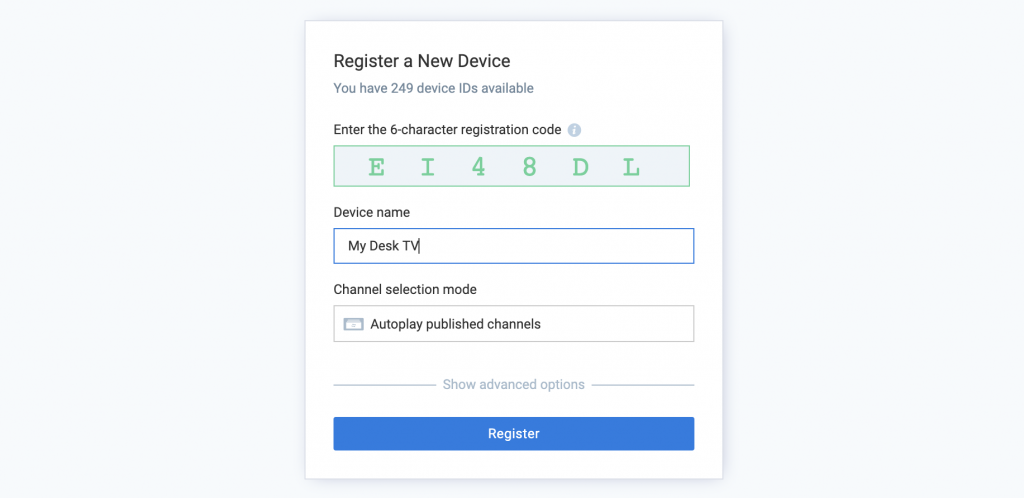
Register the device and give it a name

Take the 6-character code that you see on the device’s screen, and enter it into the registration input field. When a valid code is detected, the input field will be highlighted in green. Give your device a name.

3

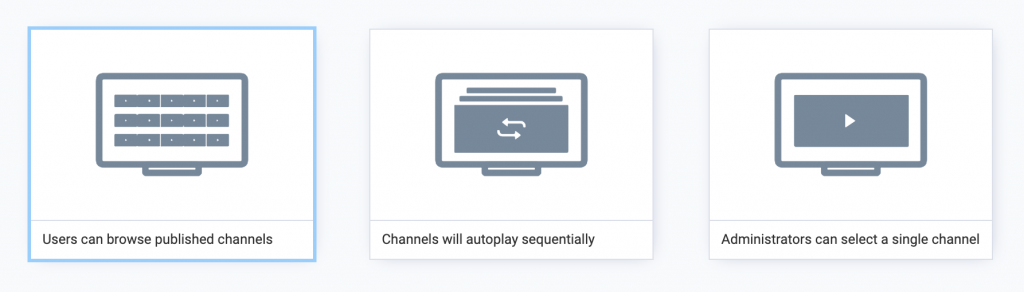
Set the channel selection mode

Click on the Channel Selection Mode field and select the option that matches your digital signage requirements:

  • If you are using only one playlist channel for both display modes (Background and Standby), select Administrators can select a single channel and choose which channel to use..

  • If you are using two different playlist channels for each display mode, select Users can browse published channels.

4

Complete the device registration

​Click on the Register button to proceed with the registration process. On the TV screen, you will see the automatic registration process step through to completion, and will then display the channels that you have selected when the appropriate digital signage mode is activated.

5

Congratulations!

You have successfully configured a Crestron Airmedia 2.0 device with digital signage enabled and have registered it with Appspace.

The channel that you have assigned to the device will then be displayed automatically when the appropriate digital signage mode is activated. You can always change the channel that is being displayed for digital signage at any point in time.

What's Next?

Deepen your knowledge of Appspace administration details for channels and more by taking a look at administration paths and guides.